DIY Book Page and Burlap Garland Tutorial
Looking for an easy way to add a little rustic charm to your home? This DIY book page and burlap garland is a simple, budget-friendly craft that combines the vintage look of old book pages with the natural texture of burlap.
I love decorating with neutral colors and natural textures, especially when fall rolls around. This handmade garland is perfect for a fall mantel, a shelf, a tiered tray backdrop, or even your holiday decorating. And because it uses such simple materials, you can customize it to fit your own decorating style.
The best part? You don’t need fancy crafting skills to make it!

Why You’ll Love This DIY Book Page Garland
- Budget-friendly: Repurpose old book pages and use a small amount of burlap and twine.
- Easy to customize: Make your garland as full or as simple as you like.
- Perfect for fall: The combination of vintage paper and burlap creates a warm, rustic look.
- Versatile decor: Hang it on a mantel, drape it across a shelf, or incorporate it into your seasonal decorating.
Supplies You’ll Need
40 vintage book pages
1/8 yard burlap strips
1 yard jute or twine
hole punch
sharp scissors

How to Make a DIY Book Page and Burlap Garland
Step 1: Fold the Book Pages
Start by taking your book pages and folding each one into a fan shape.
For this project, each page is folded three times. You can make the folds thinner or thicker depending on the look you want. Smaller folds create a more detailed, textured fan, while wider folds give the paper a slightly simpler appearance.
Try to keep your folds relatively even so the finished garland has a consistent look.
Repeat this process with your book pages until you have enough folded pieces for your desired garland length and fullness.
Step 2: Punch a Hole in Each Folded Page
Once a page has been folded into a fan, use a hole punch to make a hole through the center.
Make sure the hole punch goes through all the folded layers so the page can slide onto the twine.
Repeat with the remaining folded pages.
Step 3: Cut the Burlap into Strips
Next, prepare your burlap. Burlap can fray and get messy when you cut it, but there’s a simple trick that makes cutting it in a straight line much easier.
- Decide where you want to cut the burlap.
- Carefully pull out a single strand of burlap along that line.
- Continue pulling the strand out until you have a visible space to follow.
- Use sharp scissors to cut along the opening.
This technique creates a guide for a straighter cut and helps you get more even burlap strips.

Step 4: Thread the Book Pages onto the Twine
Now it’s time to assemble your garland!
Take your length of jute twine or string and slide each folded book page onto it through the punched hole.
Continue adding pages until your garland reaches the fullness you want. You can space the paper fans close together for a fuller look or leave more room between them for a lighter, airier garland.
There’s no need to make every garland exactly the same. Part of the charm of handmade decor is that you can make it your own.
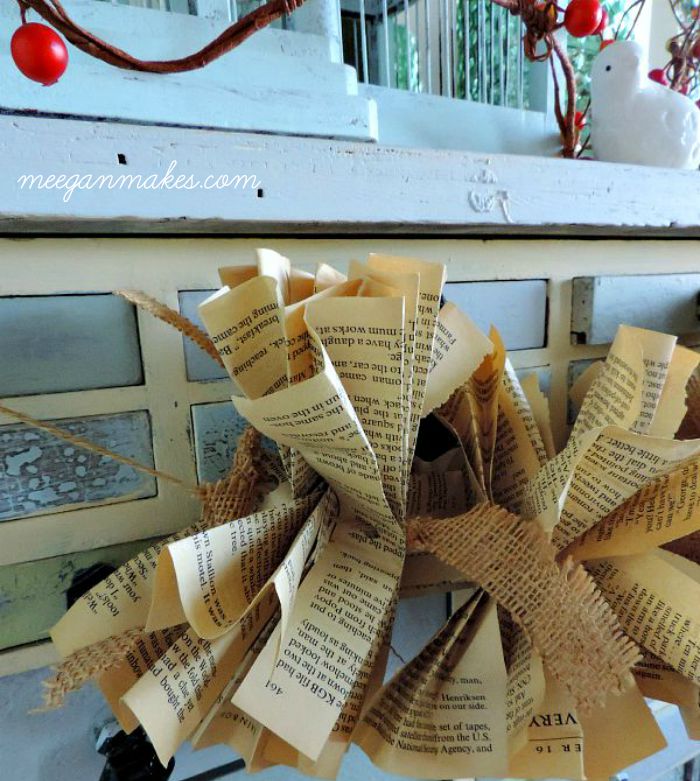
Step 5: Add the Burlap Strips
To finish the garland, tie a strip of burlap at each end of the twine.
Then, add more burlap strips between the folded book pages. The original design places a burlap strip approximately every fourth paper fan.
I love the contrast between the delicate book pages and the coarser burlap. The two materials have such different textures, but they work beautifully together to create a simple, rustic decoration.
You can adjust the spacing to suit your taste. Add more burlap for a fuller, textured look, or use fewer strips if you prefer a more understated design.

Step 6: Hang and Enjoy Your Garland
Your DIY book page and burlap garland is ready to display!
Drape it across a mantel, hang it along a shelf, or use it as part of a seasonal vignette. The neutral colors make it especially easy to mix with wood accents, pumpkins, greenery, and other fall decorations.
Although this garland is lovely for autumn, you can also leave it up throughout the year. Its vintage-inspired look works with farmhouse, cottage, rustic, and neutral home decor.

Tips for Making Your Garland
Make it as full as you like. The number of book pages you use will affect the final look. Start with the suggested amount and add more if you’d like a fuller garland.
Keep your folds consistent. Similar-sized folds help your paper fans look balanced when they’re strung together.
Use the burlap cutting trick. Pulling a strand out before cutting gives you a handy guide and helps keep the edges neater.
Experiment with the spacing. The burlap strips don’t have to be placed at exactly the same intervals. Try the original pattern first, then adjust it to create a look you love.

Where to Use Book Page and Burlap Garland
This garland is a lovely addition to many areas of your home. Try displaying it:
- Across a fall mantel with pumpkins and candles.
- Along a bookshelf for a touch of vintage-inspired charm.
- On a console table as part of a seasonal display.
- With other neutral decorations for a cozy farmhouse look.
- As part of your Thanksgiving or holiday decorating.
You can even make a shorter version to decorate a small shelf or a favorite vignette.

More DIY Ideas to Try
If you enjoy crafting with simple materials and adding handmade touches to your home, explore more DIY projects on Domestically Designed. Try incorporating burlap into another seasonal project or creating a different garland to complement your fall decorations.

Make Your Own Book Page and Burlap Garland
This DIY book page and burlap garland proves that you don’t need expensive supplies to create something beautiful for your home. With a few old book pages, burlap, and twine, you can make a charming decoration that adds texture and a vintage feel to your space.
I hope this project inspires you to pull out your craft supplies and make something lovely for your home. Have fun creating your own version, and enjoy decorating with it throughout the fall season and beyond!
Thanks Meegan from What Meegan Makes for sharing this awesome project with us. Make sure you check out Meegan and her other projects below.
I have also made book page flowers and I have other ideas for using burlap.
I don’t want you to miss out on my latest posts. So make sure you sign up to receive my posts directly to your inbox.